Peeled Paint method

This is an easy way to make an interesting background for your art. It is designed to look like years of wear and tear on your substrate with subsequent layers showing through. Let’s get started!

The first step is to cover your surface with papers and paint. I use Decoart Americana brand craft paints in the bottles.  This can be on a canvas, as the sample above, or a page spread as shown in my process. I have used text, notes, napkins and papers that are mod podged to the surface. You can also use gel medium. Then I came in with acrylic paints to cover the white areas.366 days406

The second step is to cover the areas you want to show through with petroleum jelly. You may want to save images and some of the underneath paint color. Then cover the whole surface with a new color of paint. Let the whole thing dry. The areas with jelly underneath may be a little mottled. I don’t have a photo of this step as I didn’t want to get my copier full of jelly.

The third step is to wipe off the surface when it is completely dry. I use paper towels to do this. Keep changing to a clean area of towel until the surface feels dry and the jelly is all gone. Your paint will have a nice textured look.366 days407

At this point you may want to add some new papers. Then add more jelly to the parts you want to save. Try to include  places from the first and second layers with images and paint colors from both.366 days408

Cover the whole surface with a new color of paint and let dry completely. When dry you can repeat the process of wiping off the paint and jelly to reveal a new incarnation of your wonderful background. Now you can finish the piece with a focal image on the top as I did in the canvas painting above.366 days409

Here is one more canvas I did where the image is under the final layer of paint. Now go forth and try a few paintings of your own.canvas'001

Travel and Art Making

IMG032Do you travel? Do you make art? Do you make art while you travel? I do. When we began traveling, I would keep a written journal of our trip. Then I decided to make some art while I traveled. First I took my sumie supplies with me to our first OAT trip to Vietnam. They turned out beautifully, but I seldom had the time or enough space to grind the ink and set out the supplies. For India I tried an altered child’s board book. But my prep and or supplies were not right. I had trouble working on the surface and not enough pages and I finally just gave up. For China I tried colored water color pencils and note cards, but was not impressed. It was also difficult to handle all the pencils while on a boat along the Yangtze River. I finally turned to small sketchbooks. My first one was one I bought in India that I used for the Grand Circle Travel trip to the Copper Canyon in Mexico. That one was published in Somerset Studio’s ArtJournaling magazine! I was validated and absolutely thrilled. I could do this!

journals050
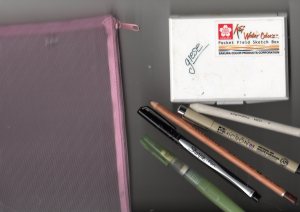
Along with the sketchbook, your supplies can be very light and limited. I usually use a small pouch or large zippered pencil case. I like the Sakura, Koi travel water color set because it comes with a waterbrush. I carry extra waterbrushes, waterproof fine line black pens and often a nice pencil and stump for shading my ZIA bookmarks to give away. My kit also may include a few colored pencils and pens, some textures like small pieces of shelf lining or corregated cardboard cut from a coffee sleeve, a small bottle of water( hotel shampoo size),kneaded eraser and paper towel.

IMG_041
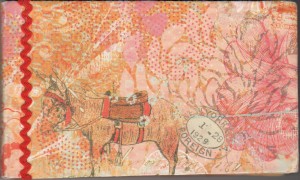
The joy of travel now includes the making and decorating of the journal before the trip. This one I made for a cruise to the Sea of Cortez. I used one sheet of 12×12 double sided paper for the cover and embellishments on all the pages.

journals051
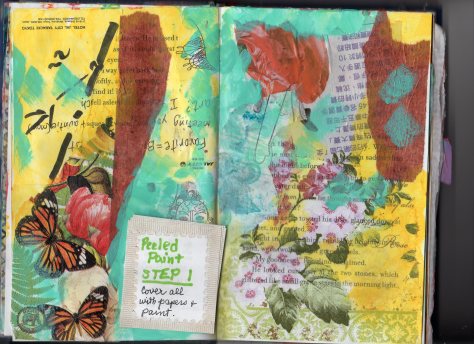
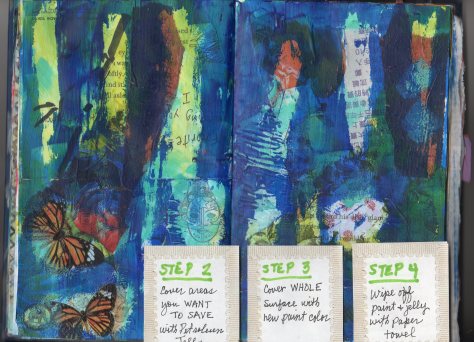
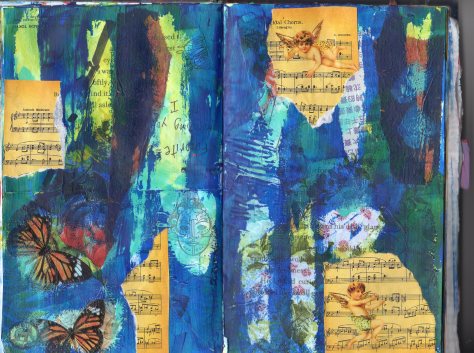
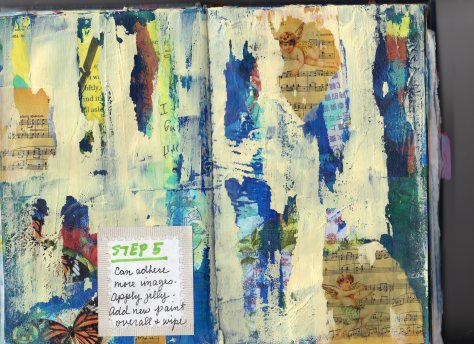
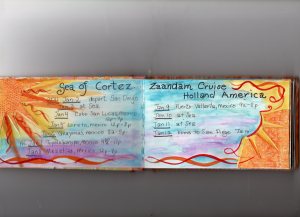
Preparing the book in advance allows me to use a lot of materials I wouldn’t take along on the trip. For this one I used the paper sparingly by adding both the positive and negative pieces of the paper as you can see from the sun and its outline above. I also used acrylic paints. Other books have stamps and distress inks, collage elements and insides of business envelopes. Make the pages so pretty you can’t wait to work on them. I usually add my itinerary and sometimes air travel. For OAT trips I add a list of our fellow passengers. Sometimes I add a pocket in back for this and that.

IMG_0031IMG_0045
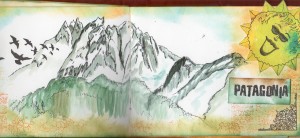
I used a store bought Moleskine sketchbook for our cruise to Vietnam. I decorated the edges with distress inks. On the earlier pages, I added a lot of cuttlebug die cut leaves, flowers and branches as green is the color I associate with Vietnam. Patagonia was our latest trip with OAT. I made this book. I decorated each page spread with a different sun. I used a whole lot of my rubber stamps and cling stamps. And once again I inked the edges as I feel that gives a finished touch to the pages.

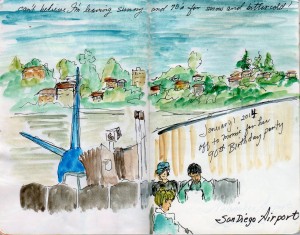
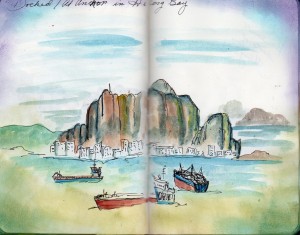
On location, when the bus driver says we are going to have a 10 minute photo stop, that is when I do a 10 minute sketch of the beautiful scene. I just do simple lines. When I get back on the bus, to my room, to the ship’s lounge or whatever, I get out my watercolors. I never mind what the real colors are, I just paint in the colors I feel like painting, though I do try to keep snow kinda white…hehehe.  Often I’ll then go back in with my pen and do some details or refine lines. Sketching on location gets the day, the scene, the setting into your heart and soul. When travelers come home and look at a photograph, they may or may not remember where it was taken. On the other hand, if you’ve sketched it, you may remember all the details..where you stood, what the weather was like and the whole feeling of being there.  I will try to sketch anything, even if I think I can’t. The joy is in the experience.

journals052
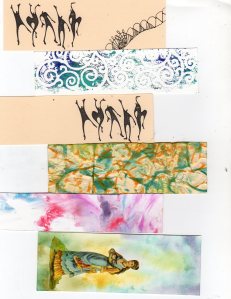
I love to share my art with others. I take along a batch of bookmarks. Some of them are blank, while others, like those above, may have inks or stamps or images on them waiting to be filled with patterns and sayings. I love to do zentangle inspired art(ZIA) on planes and in my spare time and the small area makes these the perfect surface. When people are interested in my art making, I often give them one of these for their interest. I also give them to fellow passengers or people who have been kind or helpful along the trip.

journals053
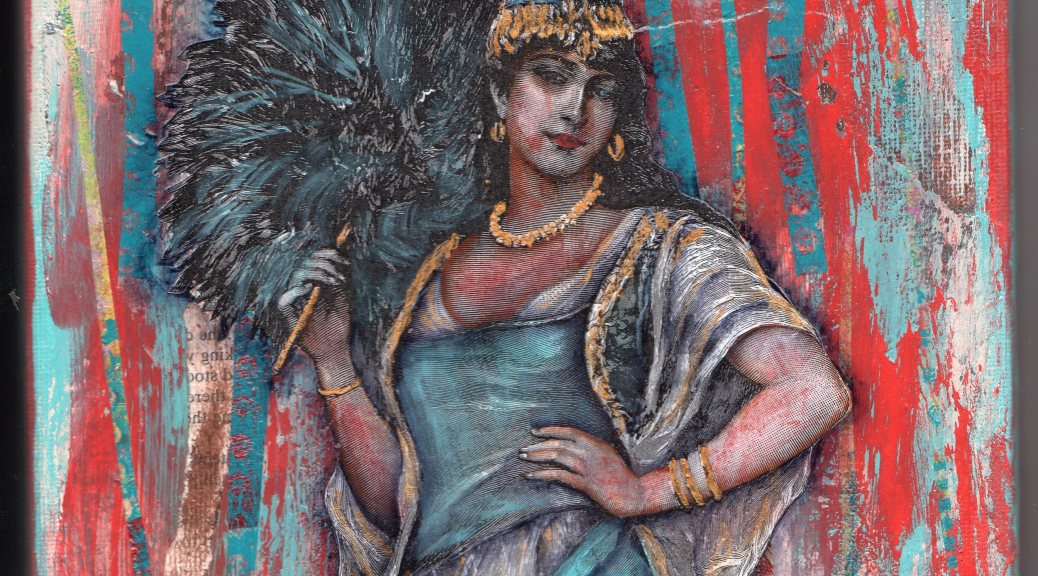
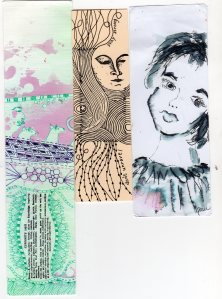
Here are a few that are finished. For the girl I used an Elegant Writer pen. It is watersoluble so the shading is made easy with a waterbrush.

On trips I often offer to teach someone how to sketch, how to do a zentangle pattern and have given spontaneous lessons. I’ve taught complete novices who were surprised at their results.  Recently I decided to take my friends up on the suggestion to lead a travel sketch group. Since I love OAT(Overseas Adventure Travel) and GCT(Grand Circle Travel) and have taken 12 trips with them, I thought that would be a great fit for this kind of travel. I formed my first group to go to Peru and Macchu Picchu this August 17, 2015. Well…2 people are going with me…sigh. Other group leaders told me I needed a longer lead time. So I will give it one more try. I have booked a group to go to Dubrovnik Croatia next April 12th, 2016. You can see the trip at this link http://www.gct.com/cta2015  My group is called Linda’s Travel Sketchers and the service code is G6-26533. So far, I am going alone…but have hope. I’ll be teaching as much as people want every day. There is no charge for the sketching and painting instructions. So come along and sketch the world with me. If that isn’t in the cards, go forth and sketch your world…even if you think you can’t!

Making Faces

I would like to draw faces better. I have been told to practice, practice, practice. Well, I need a bit of fun added to all that. I got some new small journals from my friend, Beth. She decorated the covers with a gelatin plate print.

blog002

I drew my first face looking at a photo in a magazine. Well, at least you can recognize it as a face. Now to add the amusing part. I found words that are positive and words that are negative. There are all kinds of sayings that start with “You’re not___, you’re______.” It might be fun to just insert random words to bring a smile when looking at the pages of my practice faces.  Here are the results. I’m hoping you will find them amusing as well.

blog003 blog004 blog005

Now go make your own art and make yourself smile today!

Personal Handwriting

People have told me they like my handwriting when they see my art journals. I did get A’s in handwriting while I got C’s in art! Now it is all well and good if you have good handwriting, but to add your personal script in your art is less about it being good than it is being yours.

IMG_0001

Have you ever found a handwritten note, card or recipe from a relative who is no longer here? Isn’t it thrilling to see something that you know they held in their hands and wrote themselves. Even our children’s handwriting tentative and inexperienced as it is brings a special joy. These things have meaning not because they are “pretty” but because they are evidence from a precious hand. Your hand, your writing is just as precious and should be added to your art.

blog001

I love my friend Gerry’s handwriting. I used it as a background paper on one of my journal page spreads.

journals047

I had a letter from a German relative. Carl Heinz had organized a family reunion in Germany that we attended a few years before he died. So his last hand-written letter to us was precious to me and I photocopied it and used several bits of it in an altered book about family stories.

So, be brave, leave your mark. It is nice to have fancy stamped words and interesting cut out words, but nothing can compare to your own handwriting. Leave behind your art, but also your own special handprint..your written words for future generations to touch.

Keeping up with online art projects

Have you ever joined an online art group or challenged yourself to a yearlong project? In the beginning we all have high hopes and aspirations to make a lot of art daily, weekly or monthly and then fall behind. We seem to do this with diets and resolutions as well. I’ve come up with some ideas to help us along the way without feeling like total failures.

KNOW YOURSELF
. In 2013 I did an online group and discovered I didn’t like the song title prompts since I didn’t know the songs. Sometimes I made art from the titles. Sometimes I listened to the song online, then did the art. It didn’t seem personal or exciting to me, so I switched gears, made up my own prompts, and dropped the project all together. As much as we’d like to sometimes, we really don’t change much. Don’t beat yourself up over not completing a project. Once you realize a group isn’t for you, move on. We all don’t have the same tastes in art or art prompts and it’s okay to let go and move on.

FIND THE RIGHT GROUP
Last year I started Journal 52 with high hopes. I made my book…well started to…by cutting and exposing a corregated cardboard cover that I planned to decorate…sigh. I cut enough pages of bristol to get started. I had the grand idea to put the word prompts or part of them in block letters along the end of each page and cut around them. I didn’t think I’d have any trouble keeping up as the pages weren’t that big and there was only one a week Chelle Stein had such wonderful prompts. I may have finished 8 or 10 of the 52.
Journal 52004

Journal 52005

Journal 52006

Journal 52007

Journal 52008

Journal 52009

Journal 52010

As I knew I loved this group, this year I began again. But, knowing myself and my busy life, I decided to pare down my expectations. Not every page would be a weeks worth of work. I’d start with a smallish premade book. That takes several hours off the table. No restraints as to shape or decor of pages. Make art for the prompts for me. Post them or not. We are only on week 5, but so far so good…and already better than last year!
journal 52001

journal 52002

So here is my advice. Do the prompts you want to do.
See the project as a learning experience without expectations.
Like a diet, let lapses go and start each day/week as a new beginning.
Change directions if something isn’t working for you.
Re-title: Instead of 365 days of faces….365 days (or thereabouts) of faces
Almost 52 week journal
Prompts I liked from 2015
Art should be fun and if it becomes filled with angst and pressure, it is time to lighten up and move on to whatever makes the joy come back into your art making. Now go play!

Looking at the negative space

I recently took a class that reminded me of a watercolor painting that I did years ago. I was working on Arches 100% rag paper and learned if I had a really awful painting, I could scrub most of the paint off with a toothbrush under running water. So I did that, and ended up with a muted background. I learned to paint around shapes with a dark color and pull out stems and leaves by leaving them the muted underpainting. classes006

Fast forward many years and Elaine Pierce presented a class she said was inspired by me. I didn’t see how, until I took the class and she gave me credit for teaching her how to use napkins in collage. As often happens with my teaching, I present a little technique and my students come up with amazing art. This is why I often brag that although I’m not that great an artist, I must be a great teacher as my students often surpass me with inspired, beautiful art.

In the class, we did a light brush-blend background using colors suited to our chosen napkin color palette. Mine was yellow, gold and white. Then we penciled in our tablecloth, vase and where our leaves would mostly be. We covered these places with bits of our separated napkins. (When using napkins in collage, you separate the white background layer(s) from the colorful top). We used mod podge. We then mixed our background color and painted around our tablecloth, vase and leaves. I had trouble seeing where to put my leaves and covering some up, so I resorted to outlining them with a black sharpie. I added some shadows and white ferns. I finished with 3 coats of varnish.Class pictures008

For the book page spread, I simplified the process. I skipped the underpainting and started with drawing the 3 trees with a black pen. Then I took a variety of napkins and tissue papers to make the trees distinctly different colors in the foliage. I tore the papers into tiny pieces and adhered them with mod podge. You don’t have to be careful to stay within the lines you’ve drawn as you will be redrawing them later. The tree trunks were covered with bits of the inside of a business envelope and a little napkin. We then adhered some dark green tissue at the roots of the trees to pull out some grasses. We took our black pens and redrew the trees taking advantage of the out-of-the-line bits to add a little more interesting shapes to them. We also drew in simple grass shapes. Then we poured out some acrylic paint using a big puddle of turquoise and a little dark blue to make it darker than some tissue we used. We loaded a brush with mostly turquoise and a swish of the dark to create a little variation in the painted surface (though I’m not sure it shows!). We painted around all our drawn shapes. I used the dark blue paint and an angle shader brush to float in some shadows along one side of the trunks, the bottom of the foliage and some in the middle of the leaves.

It is a fun process and you could do this with any kind of background. So go and play!

ZIA…zentangle inspired art

I just learned what to call my doodling with a plan…zentangle inspired art. I guess since I am not a CZT..certified zentangle teacher by studying with Rick and Maria…I can’t call what I do zentangle.  So, semantics aside, I received a wonderful new book for Christmas called The Beauty of Zentangle by Suzanne Mc Neill, CZT and Cindy Shepard, CZT. They have included examples from 137 tangle artists from all over the world. It is a fabulous book full of inspiration! I was so entranced by a couple of tangles I hadn’t seen before, that I set about doing them over and over to learn them well.

I was also delighted to see two of my friends included in the book. Sandra Strait of lifeimitatesdoodles and I exchanged atcs (artist trading cards) just before she began her obsession and delight in tangling. I remember her asking if anyone else loved making up new designs. I was mesmerized by some of her early work and how intricately she would shade her art. I’m not surprised at all about her current success. The other person I recognized in the book is the owner of a shop I frequent,  someone I know  personally, Jennifer Van Pelt, CZT. Her work is so precise and designed so beautifully that it is a pleasure to see it around the shop.

Right now I am working on a card for my Mom’s 91st birthday. No one should have a January birthday…especially if it comes early in the month. I’m using a card that I marbled when I had out the shaving cream some time ago. I drew two halves of a heart and “tied” them together with strings. One of the cards shown here will give you an idea of that.

So here are the cards I made from December 26th to the 29th. The face idea came from Annika Sylte of Norway. She drew a beautiful face, I glued one on. The cards are atc sized because I plan to trade them at Artzona in February. atc,zentangle001 atc,zentangle002

Carving your own stamps

Have you ever wanted to make your own stamps? It may be easier than you thought! You can just carve patterns. Houses are always fun and fit into a variety of places in your art.  For the flower stamp, I used a flower shaped eraser!  The easy carve material from Speedball or Artist and Craftsman is much easier to carve than the erasers which are a bit harder rubber. I bought a carving set, but find I mostly use the curved tool for gouging out my pattern. For the face and dancing girl, I traced an image with a pencil onto tracing paper. I tried to transfer the image with graphite paper, but it wouldn’t stick. In desperation I just turned the pencil over and rubbed the back. Voila…a perfect image appeared! Much easier than I made it out to be.  It is really fun to stamp in black ink over your fancy gelli plate or dylusions spray backgrounds. I prefer the black Versafine stamp pad. It is waterproof and gives a great impression. Try it…you might like it!Stamps 001

Sketching and painting in a grid

sketchbooks016Sometimes you would like to sketch several small montages instead of a whole scene. On this first page I had gathered the fall leaves in Wisconsin and brought them inside to sketch.  Here is my process. My favorite everyday sketchbook is the Visual Journal by Strathmoresketchbooks017I use repositionable tape and section off the areas. (I re-use the tape for other pages and just keep it inside my cover.)Then I use watercolor washes to give the sections a cohesion even though each section will be a separate picture.sketchbooks018After painting in all the sections, or adding journaling in some, I remove the tape and have the option of writing in the empty lines.sketchbooks015This second page I did because the architecture in Balboa Park is quite intimidating to me.  By breaking it up into small sections, I am a little braver to capture some of the interesting details.  This is a simple technique that I hope you will try in your sketchbook. Now go make art!

You can follow my art journey here